Lightning Web Component (LWC) - Core


Web component:
LWC file types:
Lightning Data Service
Lightning Messaging Service
Decorators
-
To expose a public property, decorate a field with
@api. Public properties define the API for a component. Public properties used in a template are reactiveA Component is re-rendered when the value of a referenced public property is modified or changed
To pass data from parent component to child component, @api decorator in the child component exposes a property by making it public so that parent component can update it
@api properties can be exposed in an App builder
-
Previously, you had to use the
@trackdecorator to make a field reactive. Beginning in Spring '20, all fields in a LWC class are reactive.If a field is assigned an object or an array, the framework observes some changes to the internals of the object or array, such as when you assign a new value.
You still need to decorate a field with
@trackin these use cases:Observing changes to the properties of an object
Observing changes to the elements of an array
-
Reactive wire service is utilized in LWC to read the Salesforce data from apex class into LWC
Component is re-rendered when wire service provisions the data from apex class. The output from apex method is set to a property
Communicate with Events
To get a reference to the object that dispatched the event, use the
Event.targetproperty which is part of the DOM API for events.To create an event, use the
CustomEvent()constructor. To dispatch an event, call theEventTarget.dispatchEvent()method.The
CustomEvent()constructor has one required parameter, which is a string indicating the event typeselectHandler(event) { // Prevents the anchor element from navigating to a URL. event.preventDefault(); // Creates the event with the contact ID data. const selectedEvent = new CustomEvent("selected", { detail: this.contact.Id }); // Dispatches the event. this.dispatchEvent(selectedEvent); }
Attach an Event Listener Declaratively
Declare the listener in markup in the template of the owner component, in this example,
c-parent<!-- parent.html --> <template> <c-child onnotification={handleNotification}></c-child> </template>
Attach an Event Listener Programmatically
Define both the listener and the handler function in the
c-parentJavaScript.// parent.js import { LightningElement } from "lwc"; export default class Parent extends LightningElement { constructor() { super(); this.template.addEventListener("notification", this.handleNotification); } handleNotification = () => {}; }To add an event listener to an element within the shadow boundary, use
template.this.template.addEventListener();To add an event listener to an element that a template doesn’t own, call
addEventListenerdirectly.this.addEventListener();
Event Retargeting
When an event bubbles up the DOM, if it crosses the shadow boundary, the value of
Event.targetchanges to match the scope of the listener. This change is called “event retargeting.” The event is retargeted so the listener can’t see into the shadow DOM of the component that dispatched the event. Event retargeting preserves shadow DOM encapsulation.Imagine an event is dispatched from a
divelement in thec-todo-itemcomponent. Within the component’s shadow DOM,Event.targetisdiv. But to a listener on thepelement in the containingc-todo-appcomponent, theEvent.targetisc-todo-item, because thepelement can’t see into thec-todo-itemshadow DOM.<c-todo-app> #shadow-root <div> <p>Your To Do List</p> </div> <c-todo-item> #shadow-root <div> <p>Go to the store</p> </div> </c-todo-item> </c-todo-app>It’s interesting to note that to a listener on
c-todo-item, theEvent.targetisc-todo-item, notdiv, becausec-todo-itemis outside the shadow boundary.
Event Propagation
After an event is fired, it can propagate up through the DOM. To understand where events can be handled, understand how they propagate
Events bubble up through the DOM; that’s how children and parents communicate— props down, events up
Event targets don’t propagate beyond the shadow root of the component instance. From outside the component, all event targets are the component itself. However, inside the shadow tree, you can handle events from specific targets in the tree
Every web component’s DOM is encapsulated in a shadow DOM that other components can’t see. When an event bubbles (
bubbles = true), it doesn’t cross a shadow boundary unless you configure it to (composed = true).Slots - A web component can contain
<slot></slot>elements. Other components can pass elements into a slot, which allows you to compose components dynamically.When a component has a
<slot></slot>, a container component can pass light DOM elements into the slot.<!-- flattened DOM --> <body> <c-container> #shadow-root <c-child-slot> #shadow-root <h2>I can host other elements via slots</h2> <slot> // To the outside world, // I'm not part of c-child-slot shadow DOM // I'm part of c-container shadow DOM <p> To c-container, I'm light DOM.</p> </slot> </c-child-slot> </c-container> </body>The browser renders the flattened tree, which is what you see on the page. The important thing to understand is that the DOM passed into the slot doesn’t become part of the child’s shadow DOM; it’s part of the container’s shadow DOM.
When you create an event, define event bubbling behavior using two properties:
bubblesandcomposed.bubbles : A Boolean value indicating whether the event bubbles up through the DOM or not. Defaults to
false.composed : A Boolean value indicating whether the event can pass through the shadow boundary. Defaults to
false.
event.target— A reference to the element that dispatched the event. As it bubbles up the tree, the value oftargetchanges to represent an element in the same scope as the listening element. This event retargeting preserves component encapsulation. We’ll see how this works later on.event.currentTarget— A reference to the element that the event handler is attached to.event.composedPath()— Interface that returns the event’s path, which is an array of the objects on which listeners will be invoked, depending on the configuration used.
Static Composition:
A static composition doesn’t use slots. Here we have the simplest example:
c-appcomposes componentc-parent, which in turn composesc-child.We fire an event,
buttonclick, fromc-childwhenever aclickaction happens on itsbuttonelement. We have attached event listeners for that custom event<body> <!-- Listening for "buttonclick" event --> <c-app> <!-- Listening for "buttonclick" event --> #shadow-root <h2>My app</h2> <c-parent> <!-- Listening for "buttonclick" event --> #shadow-root <h3>I'm a parent component</h3> <div><!-- Listening for "buttonclick" event --> <c-child> <!-- Listening for "buttonclick" event --> #shadow-root <h3>I'm c-child component</h3> <button>click me</button> #/shadow-root </c-child> </div> #/shadow-root </c-parent> #/shadow-root </c-app> </body>
bubbles: false, composed: false
only
c-childgets to react to thebuttonclickevent fired fromc-child. The event doesn’t bubble past the host. This is the recommended configuration because it provides the best encapsulation for your component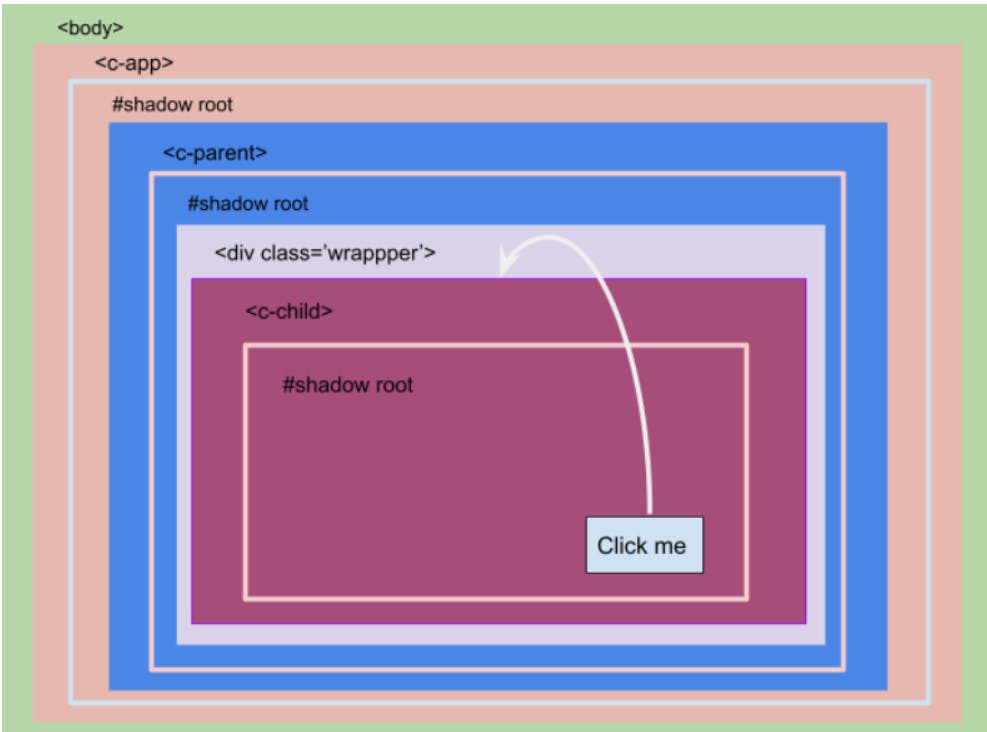
we inspect
c-childhandler’s we find these values on theeventobject:event.currentTarget = c-childevent.target= c-child
bubbles: true, composed: false
the
buttonclickevent fromc-childevent travels from bottom to top until it finds a shadow root or the event gets canceled. The result, in addition toc-child,div.wrappercan also react to the event.Use this configuration to bubble up an event inside the component’s template
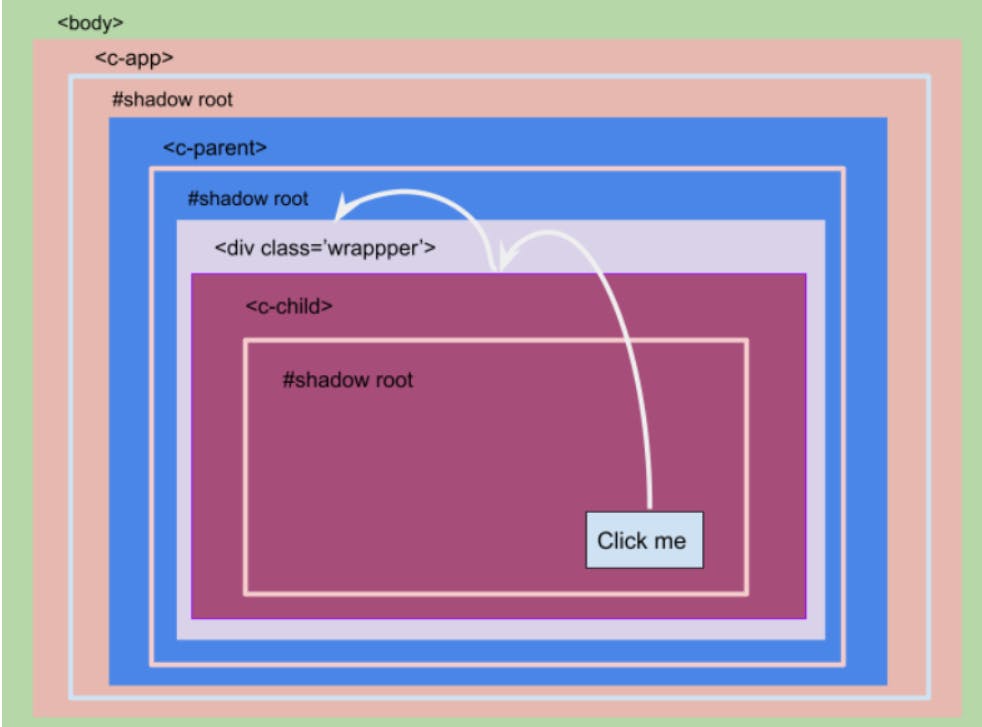
c-childhandler:event.currentTarget = c-childevent.target= c-child
div.childWrapper handler:
event.currentTarget = div.childWrapperevent.target= c-child
bubbles : false, composed : true
This configuration is supported for native shadow DOM, which means it
⚠️isn’t supported on Lightning Platform. Even for LWC open source, this configuration isn’t suggestedComposed events can break shadow boundaries and bounce from host to host along their path. They don’t continue to bubble beyond that unless they also set
bubbles:true.
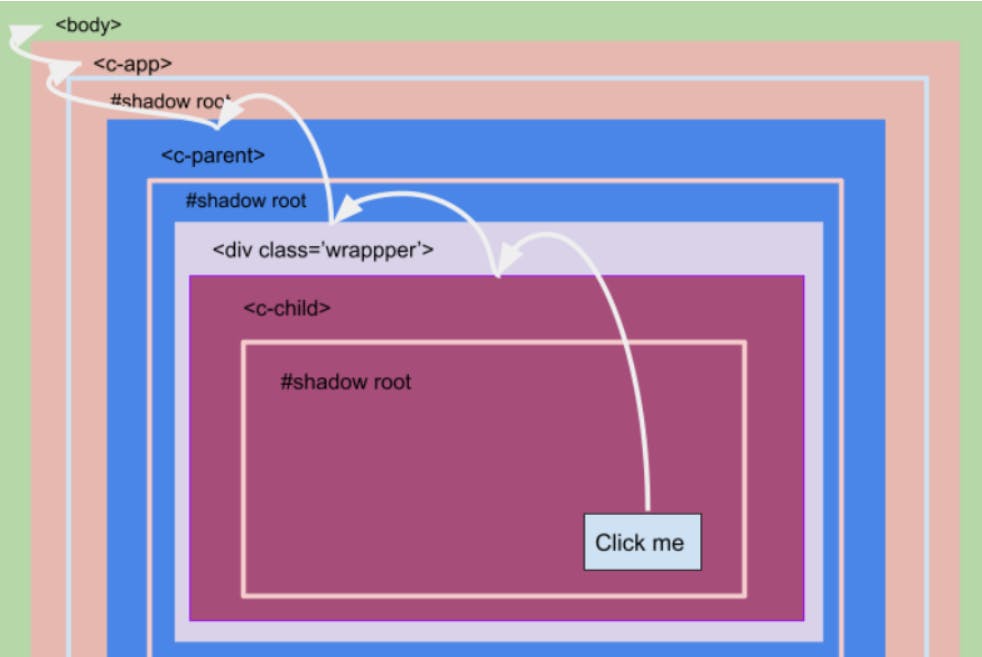
bubbles : true, composed : true
isn’t suggested because it creates an event that crosses every boundary.
Every element gets the event, even the regular DOM elements that aren’t part of any shadow.
The event can bubble all the way up to the body element.
Lifecycle Hooks
Below is the Lifecycle hooks Flow:
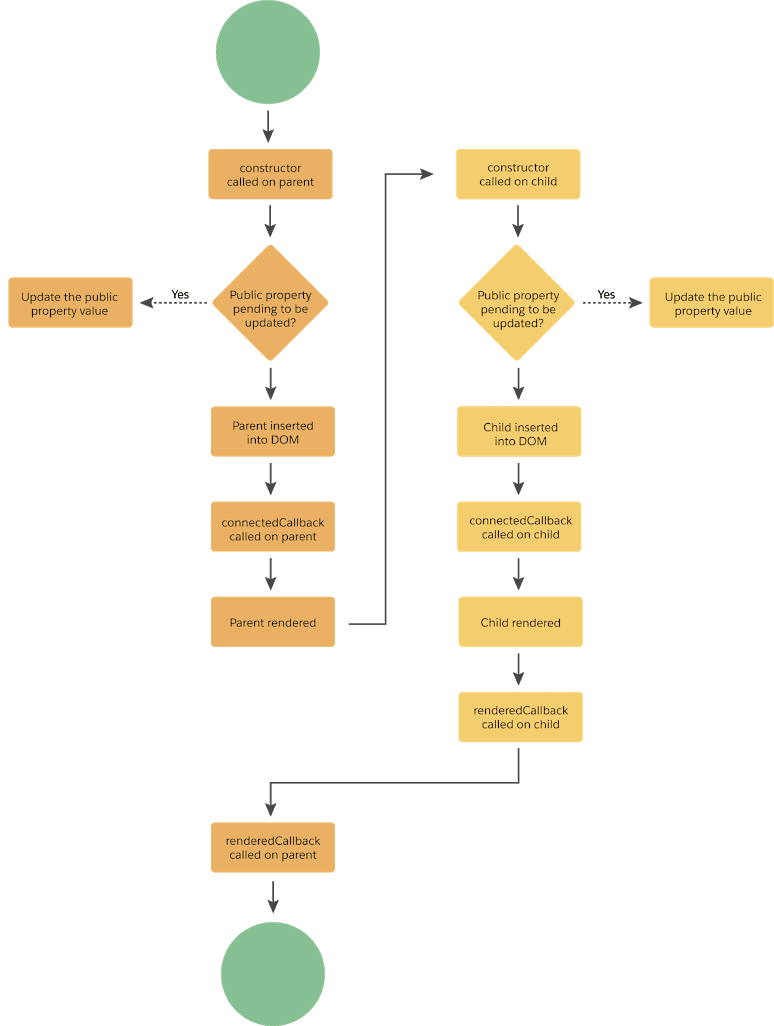
Constructor:
The
constructor()method fires when a component instance is created.Don’t add attributes to the host element during construction. You can add attributes to the host element in any other lifecycle hook
The constructor flows from parent to child.
The first statement must be
super()with no parameters. This call establishes the correct prototype chain and value forthis. Always callsuper()before touchingthis.Don’t use a
returnstatement inside the constructor body, unless it is a simple early-return (returnorreturn this).Don’t use the
document.write()ordocument.open()methods.Don’t inspect the element's attributes and children, because they don’t exist yet.
Don’t inspect the element’s public properties, because they’re set after the component is created.
Can we call an apex method inside the constructor method in Lightning Web Component? YES
Can we create and dispatch events in constructor method of Lightning Web Component? NO
connectedCallback():
This hook is invoked when a component is connected to the document. This callback is invoked after all the public properties are set and can be used to set the state of the component.
connectedCallback()fires when a component is inserted into the DOMflow from parent to child
To access the host element, use
this. To access elements in a component’s template, usethis.templatePerform initialization tasks, such as fetch data, set up caches, or listen for events
Subscribe and Unsubscribe from a Message Channel.
The connectedCallback() hook can fire more than one time. For example, if you remove an element and then insert it into another position
You can’t access child elements from the callbacks because they don’t exist yet.
public properties can be updated after the
connectedCallbackis invoked. TheconnectedCallbackis invoked only one time with the initial properties passed to the component. If a component derives its internal state from the properties, it's better to write this logic in a setter than in connectedCallback
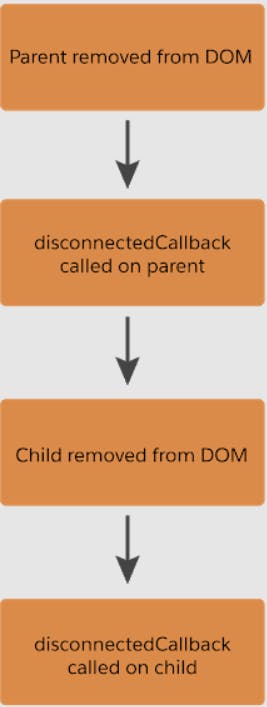
-
fires when a component is removed from the DOM
flow from parent to child
Use
disconnectedCallback()to clean up work done in theconnectedCallback(), like purging caches or removing event listeners.
-
The
renderedCallback()is unique to Lightning Web Components. Use it to perform logic after a component has finished the rendering phase.This hook flows from child to parent.
A component is usually rendered many times during the lifespan of an application. To use this hook to perform a one-time operation, use a boolean field like
hasRenderedto track whetherrenderedCallback()has been executed.When a template is rerendered, the LWC engine attempts to reuse the existing elements. In the following cases, the engine uses a diffing algorithm to decide whether to discard an element.
Elements created using the
for:eachdirective. The decision to reuse these iteration elements depends on thekeyattribute. Ifkeychanges, the element may be rerendered. Ifkeydoesn’t change, the element isn’t rerendered, because the engine assumes that the iteration element didn’t change.Elements received as slot content. The engine attempts to reuse an element in a
<slot>, but the diffing algorithm determines whether to evict an element and recreate it.Updating the state of your component in
renderedCallback()can cause an infinite loop - Don’t update a public property or field inrenderedCallback()
errorCallback():
Implement it to create an error boundary component that captures errors in all the descendent components in its tree.
It captures errors that occur in the descendant's lifecycle hooks or during an event handler declared in an HTML template.
errorCallback()catches errors that occurs in the descendant components but not itself.You can create an error boundary component and reuse it throughout an app. It’s up to you where to define those error boundaries. You can wrap the entire app, or every individual component. Most likely, your architecture falls somewhere in between. Think about where you’d like to tell users that something went wrong.
<!-- boundary.html --> <template> <template lwc:if={error}> <error-view error={error} info={stack}></error-view> </template> <template lwc:else> <healthy-view></healthy-view> </template> </template>
The
error-viewcomponent displays the error returned byerrorCallback(). Otherwise, it displays thehealthy-viewcomponent. By wrapping your component inside the boundary component, any unhandled errors are still caught by the boundary component and displayed byerror-view. When an error is thrown,healthy-viewis unmounted and removed from the DOM.// boundary.js import { LightningElement } from "lwc"; export default class Boundary extends LightningElement { error; stack; errorCallback(error, stack) { this.error = error; } }
Shadow DOM
Shadow DOM is a standard that encapsulates the internal document object model (DOM) structure of a web component.
Encapsulating the DOM gives developers the ability to share a component and protect the component from being manipulated by arbitrary HTML, CSS, and JavaScript.
Consistent Cross-Browser Experience: Not all browsers had full support for the native Shadow DOM when LWC was conceived. Using the Synthetic Shadow DOM ensures that LWC components provide consistent behaviour across all browsers.
Encapsulation Maintained: Just like the native counterpart, the Synthetic Shadow DOM encapsulates styles and scripts. Styles defined in an LWC component stay within it, and external global styles don’t influence the component’s appearance.
Scoped Events: Events that are fired from within an LWC component are also encapsulated. This ensures that event handlers outside the component cannot detect events that are meant to stay inside.
DOM Query Limitations: When querying the DOM from within an LWC component using methods like querySelector, the search is limited to the component’s template. It respects the encapsulation and doesn’t reach out to the entire DOM of the page.
Elements below the shadow root are in the shadow tree
 <c-todo-app>
   #shadow-root
   <div>
     <p>Your To Do List</p>
   </div>
   <c-todo-item>
     #shadow-root
     <div>
       <p>Go to the store</p>
     </div>
   </c-todo-item>
 </c-todo-app>
How Client-Side Caching works in LWC
cacheable methods enhances your component's performance by swiftly displaying cached data from client-side storage, eliminating the need for a server round trip
Expiration Age (Client-side Cache Timeout): In Winter '21, this duration is set to 8 hours and dictates the period for which data is retained in the cache.
Refresh Age (Refresh Interval): Set to 15 minutes, in Winter'21, this parameter regulates how long cached data remains usable before requiring a refresh.
Cache Expired Response: If the response is not present in the cache or has expired, Salesforce initiates a call to the server method, caches the response, and subsequently invokes the action callback method.
Cached Response Available and Unchanged: In the event that the response is available in the cache and doesn't require refreshing, Salesforce directly calls the action callback method using the cached response.
Cached Response Available but Requires Refresh: When the response is present in the cache but necessitates refreshing, Salesforce invokes the action callback method using the cached response. Simultaneously, it makes a background call to the server method. If the server response differs from the cached one, Salesforce triggers a second invocation of the action callback method.
To call an Apex method imperatively, you can choose to set
cacheable=trueThe caching refresh time is the duration in seconds before an entry is refreshed in storage. The refresh time is automatically configured in Lightning Experience
Order of execution of @wire in lwc
In a typical wire setup, the life cycle will be:
constructorwireprovisions empty object ({data, error} are each undefined)connectedCallbackrenderrenderedCallbackwireprovisions results from serverrender(if dirty data)renderedCallback(ditto
Using imperative Apex in the constructor, you end up with:
constructorconnectedCallbackrenderrenderedCallbackApex call returns data
render(if dirty data)renderedCallback(ditto)
With either scenario, any server-side code will be delayed until after the first renderedCallback. The initialization process of components is atomic (here, meaning a single indivisible unit of execution). All asynchronous actions (both wire and Apex), up to the allowed limit of 2,500 actions, will be queued up and sent to the server in a single call
async connectedCallback() {
  await Promise.resolve();
  let apexResults = await Promise.all([ method1(params), method2(params) ])
  // Do something with results
}
The await Promise.resolve() allows all of the wire methods to go first, in a separate server roundtrip, then the Apex methods will be called afterwards in a second roundtrip.
Refresh the Cache When Calling a Method Imperatively
To refresh stale Apex data, invoke the Apex method and then call
notifyRecordUpdateAvailable(recordIds)to update the Lightning Data Service (LDS) cache.Lightning Data Service doesn’t manage data provisioned by imperative Apex calls. After you invoke the Apex method, call
notifyRecordUpdateAvailable(recordIds)to signal to Lightning Data Service that some records are stale and refresh those records in the cache.import { LightningElement, wire } from 'lwc'; import { getRecord, notifyRecordUpdateAvailable } from 'lightning/uiRecordApi'; import apexUpdateRecord from '@salesforce/apex/Controller.apexUpdateRecord'; export default class Example extends LightningElement { @api recordId; // Wire a record @wire(getRecord, { recordId: '$recordId', fields: ... }) record; async handler() { // Do something before the record is updated // Update the record via Apex await apexUpdateRecord(this.recordId); // Notify LDS that you've changed the record outside its mechanisms // Await the Promise object returned by notifyRecordUpdateAvailable() await notifyRecordUpdateAvailable([{recordId: this.recordId}]); } }
Refresh the Cache When Using @wire
To refresh Apex data provisioned via an Apex
@wire, callrefreshApex()The parameter you refresh with
refreshApex()must be an object that was previously emitted by an Apex@wireThe
refreshApex()function returns a Promise. When the Promise is resolved, the data in the wire is freshimport { updateRecord } from 'lightning/uiRecordApi'; import { refreshApex } from '@salesforce/apex'; import getOpptyOverAmount from '@salesforce/apex/OpptyController.getOpptyOverAmount; @wire(getOpptyOverAmount, { amount: '$amount' }) opptiesOverAmount; // Update the record using updateRecord(recordInput) // Refresh Apex data that the wire service provisioned handler() { updateRecord(recordInput).then(() => { refreshApex(this.opptiesOverAmount); }); } //for wired functions @wire(getActivityHistory, { accountId: '$recordId', max: '500' }) wiredGetActivityHistory(value) { // Hold on to the provisioned value so we can refresh it later. this.wiredActivities = value; // Destructure the provisioned value const { data, error } = value; if (data) { ... } else if (error) { ... } } handler() { refreshApex(this.wiredActivities); }